Tutorial: How install the script on a MidPhase hosting account. #
This tutorial describes how to install the script under a MidPhase hosting account. MidPhase uses CPanel, so this tutorial might be useful for others who have CPanel.
Step 1 #
Log into CPanel. You will see the following screen:
Note: The above screen is customized for MidPhase, it will look different on other hosting accounts, but the features / options will be basically the same.
Step 2 #
Setup the database. Click on ‘MySQL Databases’

You will see this screen:
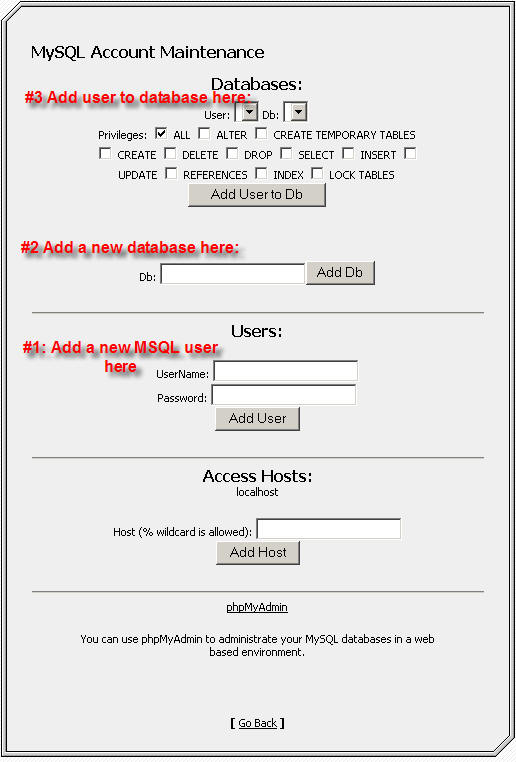
The important things in the screen above are labelled in red.
#1 – Enter the name of the database. This will create a new database. For example the name can be: million
#2 – Enter the user for the database. This will create a new database user. For example –
username: million
password: dollar
#3 – Add the user to the database created in step #2.
Please take note of your database name, Server name, Username and password for step 5 !

Note: Your MidPhase username will be joined to the front of the MySQL username and database name. So for example, if your MidPhase username is bob21 and your database name is million, the final database name will be bob21_million. The same goes for the database username.
|
Step 3 #
FTP the files to the server. Connect to the server using the details given in your MidPhase welcome email.
How to connect with FileZilla?
#1 – Click on Site Manager
#2 – Click on ‘New Site’, type in the name of your site
#3 – Type in the ftp host (eg. ftp.yourdomain.com)
#4 – Click on ‘Normal’
#5 – Enter your username & password
#6 – Click on ‘Connect’

When you log in to the server with FTP, you will see a list of directories. Always upload your files to the public_html directory.
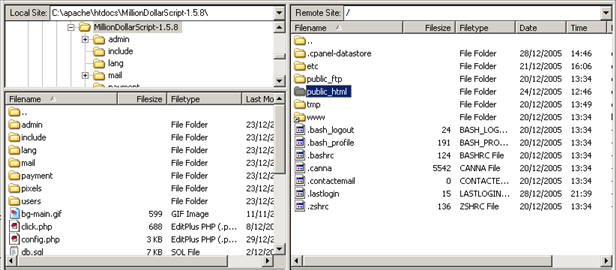
To upload the files, simply select the unzipped files on your computer on the left, right click, and then select ‘upload’. (Do not select the directory with the double periods ..)

The screenshots here show FileZilla, but the files can be uploaded using any other ftp client.
Step 4 #
Use the FTP client to set the file permissions.
admin/temp/ – chmod 777 (read, write & execute for all)
pixels/ – chmod 777 (read, write & execute for all)
config.php – chmod 666 (read & write for all)
optional: lang/english.php – chmod 666 (read & write for all)
And also (if you have the latest version):
upload_files/images/ – chmod 777 (read, write & execute for all)upload_files/docs/ – chmod 777 (read, write & execute for all)
Because MidPahse is Linux based, we need to set the permissions using chmod. Many FTP clients support this functionality.
For detailed information, please see a detailed permissions tutorial here.
Step 5 #
Go to the script’s installation page, http://www.yourdomain.com/admin/install.php
Fill in the database details that you entered in step 2
Make sure to fill it in carefully.
Click ‘Install Database’ when done.
This will install the database. Once successful, delete admin/install.php from your server.

Note: Please enter your database name, Server name, Username and password as shown in step #2
Step 6 #
Finish off the rest of the configuration. Log into the admin http://www.yourdomain.com/admin/
The default password is: ok
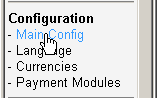
Go to the main configuration and enter the remaining setup values:
1. Set the Site’s HTTP URL address (use the recommended settings. This is a very important setting)
2. Set the sites Server path to admin (use the recommended settings. This is a very important setting)
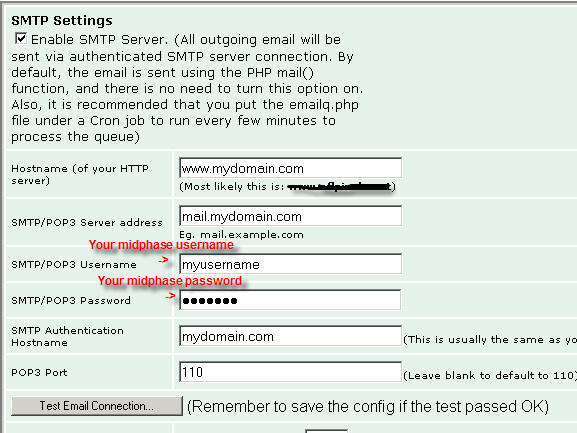
3. Enter the email account settings under the ‘SMTP Settings’. Here is an example:
4. Setup your own custom logo. Create a logo for your website and upload it. Then go to Main Config and set the logo’s URL to where you uploaded it. (Default logo is 350 x 50)
5. Enable at least one payment module. See README.txt for further details about setting up PayPal and 2CO modules.
6. You can set up the image size, and the default price. Please go to ‘Manage Images’, under the Pixel Inventory section.
7. Set any other settings that you wish, such as Admin’s email address, website name and more.
Step 7 #
That’s it! The script is now installed. There are other things you can now do, such as edit the language, set the prices, setup the payment modules. etc.
And don’t forget to process the images from the ‘process pixels’ menu!
Don’t see any homepage? You can see example.html for the home page. Rename example.html to index.html to set is as the homepage.
Hello
i found this tutorial and its very thank you.
I try to install it on XAMMP. But i cant install. Do you have an idea why ?
Kind Regards
Hello,
Do you get an error? You may wish to use the contact form or message me on Discord for support rather than comments.